Use Nginx to host multiple SSL secured websites with one external IP address
In this post, I will describe how to host multiple SSL secured domains on a Linux server with only one external IP address. For a task like this, I usually prefer Nginx as a Reverse Proxy that is used to forward incoming requests to the corresponding backend applications.
Introduction
This post explains how to host multiple SSL secured websites using one external IP address. In case you have several IP addresses you might be interested in this post that explains how to configure Nginx with separate IP addresses per application.
To demonstrate how the solution works I have installed CentOS 7 on a VMWare image. In this example, I will use self-signed certificates.
Install Nginx
In case you have a clean minimal CentOS image, we first have to install and start Nginx.
[$ ]# sudo yum install epel-release
[$ ]# sudo yum -y install nginx
[$ ]# sudo service nginx start
You can check if Nginx is up and running using this command:
[$ ]# sudo service nginx status
Redirecting to /bin/systemctl status nginx.service
nginx.service - The nginx HTTP and reverse proxy server
   Loaded: loaded (/usr/lib/systemd/system/nginx.service; disabled; vendor preset: disabled)
   Active: active (running) since Thu 2017-11-16 22:22:04 PST; 31min ago
  Process: 2465 ExecStart=/usr/sbin/nginx (code=exited, status=0/SUCCESS)
  Process: 2460 ExecStartPre=/usr/sbin/nginx -t (code=exited, status=0/SUCCESS)
  Process: 2459 ExecStartPre=/usr/bin/rm -f /run/nginx.pid (code=exited, status=0/SUCCESS)
 Main PID: 2466 (nginx)
   CGroup: /system.slice/nginx.service
           2466 nginx: master process /usr/sbin/nginx
           2467 nginx: worker process
           2468 nginx: worker process
Self Signed SSL certificates
Now let's create two private keys and the corresponding self-signed certificates. I'm using the following domains
- example1.local (Company/Organization: Example 1 Ltd)
- example2.local (Company/Organization: Example 2 Inc)
First, we have to create a directory that stores our keys and certificates.
[$ ]# sudo mkdir /etc/nginx/sslNow we can create the two example certificates and keys
[$ ]# sudo openssl req -x509 -nodes -days 365 -newkey rsa:2048 -keyout /etc/nginx/ssl/example1.local.key -out /etc/nginx/ssl/example1.local.crt

Generating a 2048 bit RSA private key
...........................................................................+++
......................................................................................................+++
writing new private key to 'example1.local.key'
-----
You are about to be asked to enter information that will be incorporated
into your certificate request.
What you are about to enter is what is called a Distinguished Name or a DN.
There are quite a few fields but you can leave some blank
For some fields there will be a default value,
If you enter '.', the field will be left blank.
-----
Country Name (2 letter code) [XX]:CA
State or Province Name (full name) []:VC
Locality Name (eg, city) [Default City]:Vancouver
Organization Name (eg, company) [Default Company Ltd]:Example 1 Ltd
Organizational Unit Name (eg, section) []:IT
Common Name (eg, your name or your server's hostname) []:example1.local
Email Address []:
[$ ]# sudo openssl req -x509 -nodes -days 365 -newkey rsa:2048 -keyout /etc/nginx/ssl/example2.local.key -out /etc/nginx/ssl/example2.local.crt
Generating a 2048 bit RSA private key
..........................+++
.......................+++
writing new private key to 'example2.local.key'
-----
You are about to be asked to enter information that will be incorporated
into your certificate request.
What you are about to enter is what is called a Distinguished Name or a DN.
There are quite a few fields but you can leave some blank
For some fields there will be a default value,
If you enter '.', the field will be left blank.
-----
Country Name (2 letter code) [XX]:US
State or Province Name (full name) []:WA
Locality Name (eg, city) [Default City]:Seattle
Organization Name (eg, company) [Default Company Ltd]:Example 2 Inc
Organizational Unit Name (eg, section) []:IT
Common Name (eg, your name or your server's hostname) []:example2.local
Email Address []:Nginx configuration
Let's create a new configuration file for Nginx
[$ ]# sudo vi /etc/nginx/conf.d/ssl.conf/etc/nginx/conf.d/ssl.conf
#
# HTTPS server configuration
#

server {
    listen       192.168.1.73:443 ssl http2;
    server_name  example1.local;

    ssl_certificate /etc/nginx/ssl/example1.local.crt;
    ssl_certificate_key /etc/nginx/ssl/example1.local.key;
    ssl_session_cache shared:SSL:1m;
    ssl_session_timeout  10m;
    ssl_ciphers HIGH:!aNULL:!MD5;
    ssl_prefer_server_ciphers on;

    location / {
        proxy_set_header X-Forwarded-Host $host;
        proxy_set_header X-Forwarded-Server $host;
        proxy_pass http://localhost:8090;
        allow all;
    }

}

server {
    listen       192.168.1.73:443 ssl http2;
    server_name  example2.local;

    ssl_certificate /etc/nginx/ssl/example2.local.crt;
    ssl_certificate_key /etc/nginx/ssl/example2.local.key;
    ssl_session_cache shared:SSL:1m;
    ssl_session_timeout  10m;
    ssl_ciphers HIGH:!aNULL:!MD5;
    ssl_prefer_server_ciphers on;


    location / {
        proxy_set_header X-Forwarded-Host $host;
        proxy_set_header X-Forwarded-Server $host;
        proxy_pass http://localhost:8091;
        allow all;
    }

}
These are the key settings:
- We have two server blocks, one for each application we want to forward requests for
- Both servers listen to the same external IP address (here 192.168.1.73) and use the standard SSL port 443
- Each application uses its own virtual server name (exampl1.local and example2.local)
- Each application uses its own set of keys and certificates
- Depending on the server name in the request, we either forward the request to localhost:8090 or localhost 8091
In case you want to set up an example like this by yourself, you can download simple example Spring Boot applications from my git hub repository, e.g. SpringAOPExample and Web Starter. As you have to start two applications you have to change the server.port property in one of the applications to 8091 (e.g. server.port = 8091).
To apply the changes we have to restart Nginx
[$ ]# sudo service nginx startTesting locally
In case you use an internal IP Address for testing, you have to set the hostnames (example1.local and example2.local) on your client computer. This is required as we have to use a domain name instead of an IP Address when sending a request. The reason is that Nginx uses the domain name (virtual host) to decide where to forward a request to and which certificate to use. If you use Linux on your client computer you can use the /etc/hosts file for the mapping as shown below.
/etc/hosts
192.168.1.73    example1.local
192.168.1.73    example2.local
Testing the configuration
Finally, let's test the configuration and check if the correct SSL certificate is used for each request. When requesting the URL https://example1.local in a browser the following certificate is being used:

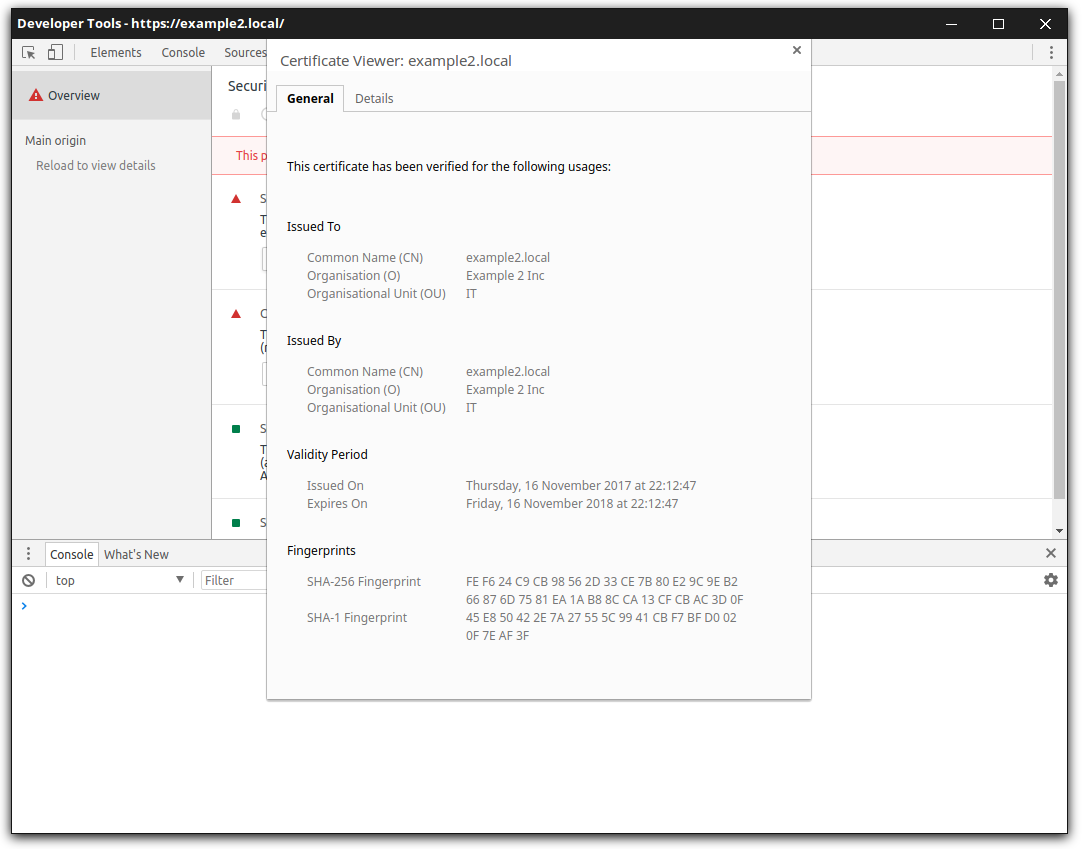
You can check the certificate details with Google Chrome Developer Tools -> Security Tab -> View Certificate to check the details about the used server-side SSL certificate. You can see that the domain name matches the requested URL and the correct Example company shows up.
Troubleshooting
SELinux blocks network connections
After configuring Nginx I received 404 errors when I tried to access the URLs. In the Nginx log files (/var/log/nginx/error.log) I saw the following error entry:
2017/11/16 22:23:11 [crit] 2468#0: *7 connect() to [::1]:8090 failed (13: Permission denied) while connecting to upstream, client: 192.168.1.120, server: example1.local, request: "GET / HTTP/2.0", upstream: "http://[::1]:8090/", host: "192.168.1.73"If this happens on Centos 6 and 7, it is likely that SELinux might deny requests.
This solution on Stackoverflow helped me to solve the issue.
You can check if this is the case by executing the following command
cat /var/log/audit/audit.log | grep nginx | grep deniedtype=AVC msg=audit(1510899791.122:353): avc: denied { name_connect } for pid=2468 comm="nginx" dest=8090 scontext=system_u:system_r:httpd_t:s0 tcontext=system_u:object_r:unreserved_port_t:s0 tclass=tcp_socketsetsebool -P httpd_can_network_connect 1Details about this solution can be found in the CentoOS wikiw.
Tags
AOP Apache Kafka Bootstrap Go Java Linux MongoDB Nginx Security Spring Spring Boot Spring Security SSL ThymeleafSearch
Archive
- 1 December 2023
- 1 November 2023
- 1 May 2019
- 2 April 2019
- 1 May 2018
- 1 April 2018
- 1 March 2018
- 2 February 2018
- 1 January 2018
- 5 December 2017
- 7 November 2017
- 2 October 2017