Spring Boot basic secured start project for web development
In this post, I will walk you through the process of creating a minimal Spring Boot web application. I use a starter project like this quite often for checking out new features or creating a proof of concept (POC). The web application will have two separate areas, a publicly accessible site and a user/password secured admin site. This example shows how to create a custom form based login screen using bootstrap 3.
Introduction
The goal of this post is to create a simple, reusable Spring Boot web application that offers the following features.
- Secured admin area: Every requested URL starting with /admin can only be accessed by an authenticated user
- Public area: All other requests can be accessed by any user - no authentication required
- Form-based login: A custom form based login page will be used to allow users to log in
- Logout: A logged in user can destroy a session by clicking the logout link
- Bootstrap 3: We will use Bootstrap 3 to enhance the look and feel of our login page.
Create a Spring Boot Starter Project.
The first step is to create a Spring Boot starter project. There are a couple of ways to do this - including from your IDE (e.g. STS or IntelliJ). I usually use the web-based Spring Initializr, that you can find here. I would recommend using the "Switch to the full version" link on the bottom of the page to see all supported modules.
For this tutorial I will use the settings as shown below:
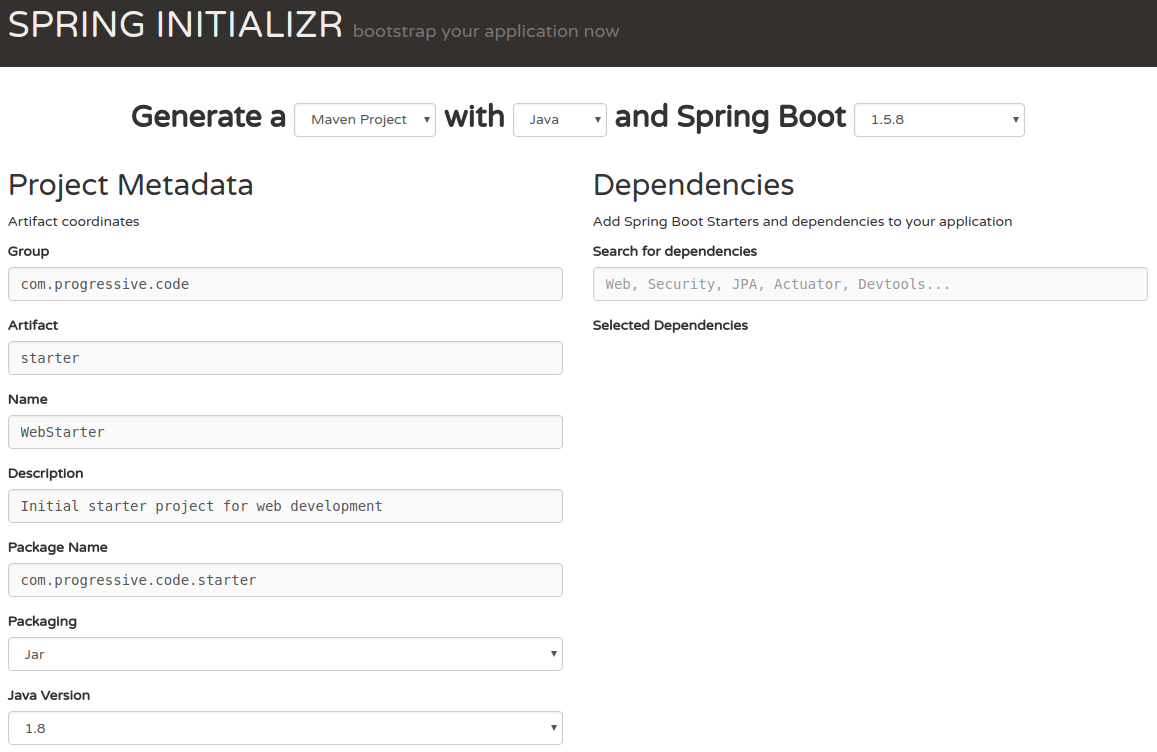
Additionally, I will select the following Spring modules:
- Core -> Security
- Web -> Web
- Template Engines -> Thymeleaf
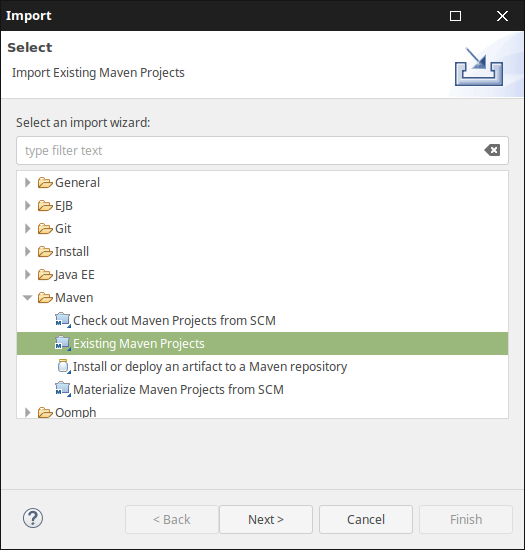
Import the Project into your IDE
After downloading and extracting the starter project, the new project has to be imported into your IDE. In this tutorial I will use Spring Tool Suite (STS), other IDEs will work in a similar way.
In STS select File -> Import -> Maven -> Existing Maven Projects
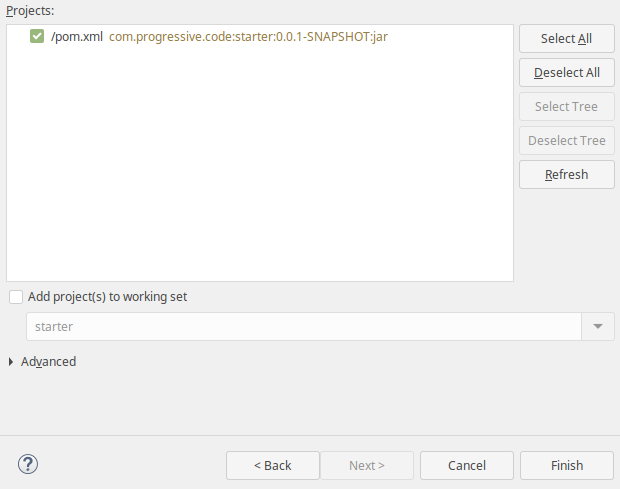
Select the folder of the extracted starter project, ensure that the correct pom.xml file has been checked and click "Finish".
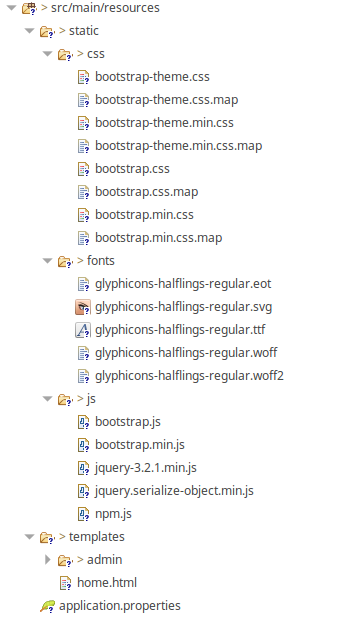
After you successfully imported the Maven project, the structure should look like depicted below.
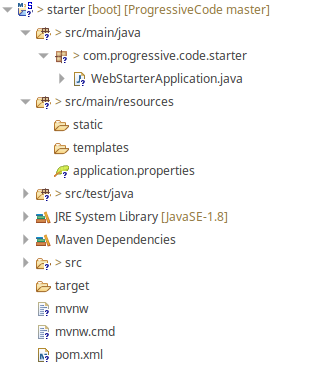
Let's quickly walk through the most important folders that have been created.
- src/main/java: As for every other Maven project this folder is used for our Java code. The initial package name and the WebStarterApplication have already been created.
- src/main/resources/static: This folder is used for all static web content like CSS, JavaScript, image and font files
- src/main/resources/templates: This folder is used for all HTML files and Thymeleaf template engine artifacts.
- pom.xml: Of course, there is a standard pom.xml file that can be used to specify our dependencies and to define the build process
Basic configuration of the web application
I usually add the following settings to the application.properties file:
server.port = 8090
spring.thymeleaf.cache=false
The first parameter changes the server port from the default value 8080 to the value 8090. This might not be required in your environment, but in my case, another application already uses port 8080.
The second parameter disables Thymeleaf caching. I usually disable caching in development as I can see modifications of my Thymeleaf templates immediately without the need to restart the application. Please keep in mind that this parameter should be set to false in a production environment.
Set fixed user and password
As we include Spring Security in our Maven pom.xml file, Spring boot automatically secures the entire website. Every time the server starts up a new password is being generated. The current password is being logged as shown in the example below.
Using default security password: f848f033-cc4e-4ecf-8113-bcf91fca4531In this example, to login to the web application the following credentials have to be used:
- User Name: user
- Password: the logged password, here f848f033-cc4e-4ecf-8113-bcf91fca4531
As this is quite inconvenient when developing an application, we will change this to use a fixed password.
Let's create an new package com.progressive.code.starter.config and create a new class WebSecurityConfig.
package com.progressive.code.starter.config;

import org.springframework.beans.factory.annotation.Autowired;
import org.springframework.context.annotation.Configuration;
import org.springframework.security.config.annotation.authentication.builders.AuthenticationManagerBuilder;
import org.springframework.security.config.annotation.web.configuration.EnableWebSecurity;
import org.springframework.security.config.annotation.web.configuration.WebSecurityConfigurerAdapter;

@Configuration
@EnableWebSecurity
public class WebSecurityConfig extends WebSecurityConfigurerAdapter {

  @Autowired
  public void configureGlobal(AuthenticationManagerBuilder auth) throws Exception {
    auth
      .inMemoryAuthentication()
      .withUser("user").password("secret").roles("USER");
  }
}
Here we define the username "user" and the password "secret". From now on we can use this combination to log in and don't have to check the log file for the generated password.
Create two controllers (public and admin area)
As mentioned above we want to split up our website into two areas - a publicly accessible area and an area only accessible for authenticated users.
Public Area Controllers
Let's create a new package for the public controllers com.progressive.code.starter.controller and add a new class StartPageController.
package com.progressive.code.starter.controller;

package com.progressive.code.starter.controller;

import org.springframework.stereotype.Controller;
import org.springframework.ui.Model;
import org.springframework.web.bind.annotation.RequestMapping;
import org.springframework.web.bind.annotation.RequestMethod;

@Controller
public class StartPageController {

  @RequestMapping(value = "/", method=RequestMethod.GET)
  public String getStartPage(Model model) {
    return "home";
  }
}
The controller class above is quite simple. We simply map the request URL "/" to an HTML page named home.html. When using Thymeleaf with the standard configuration the above controller method returns "home". Based on this String Thymeleaf expects an HTML file named 'home.html" to be available in the templates folder. This file will be created later.
Admin Area Controllers
I usually separate the secured from the publicly available resources. For the Admin Controller we create another package com.progressive.code.starter.admin.controller and add the AdminController class.
package com.progressive.code.starter.admin.controller;

import org.springframework.stereotype.Controller;
import org.springframework.web.bind.annotation.RequestMapping;
import org.springframework.web.bind.annotation.RequestMethod;

@Controller
public class AdminController {

  @RequestMapping(value="/admin", method=RequestMethod.GET)
  public String adminStartPage() {
    return "admin/adminHome";
  }
}
We use the same approach as above. The AdminController maps requests for the URL "/admin" to an HTML page named a dminHome.html in the folder templates/admin folder.
Create the public and admin start pages
Before we can start the application we have to create the HTML files referenced by the controller classes above.
Within the src/main/resources/templates folder let's first create a new subfolder named admin.
Within the templates folder "src/main/resources/templates/" we create the home.html file with the content below.
<!DOCTYPE html>
<html>
<head>
<meta charset="UTF-8" />
<title>Spring Web Demo Start Page</title>
</head>
<body>
  <h1>Start Page</h1>
</body>
</html>
Within the templates folder "src/main/resources/templates/admin" we create the adminHome.html file with the content below.
<!DOCTYPE html>
<html>
<head>
<meta charset="UTF-8" />
<title>Spring Web Demo Admin Start Page</title>
</head>
<body>
  <h1>Admin Start Page</h1>
</body>
</html>
Let's quickly test the application!
Start the WebStarterApplication and got to the URL http://localhost:8090. This URL points to our public site.
The first observation is, a login form shows up and after entering the user and password you can see the simple start page we have created.
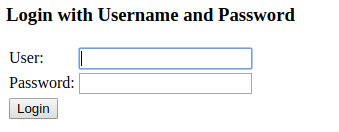
After closing the browser, opening a new browser instance and entering http://localhost:8090/admin we can see that the same works for the admin area.
In both cases, authentication is required to access the page. This is not what we want. There are public and secured areas and only the secured area should require authentication.
Adjust security configuration
The correct authentication rules can be changed in the WebSecurityConfig class we used earlier. I will add the following rules:
- permit access to all URLs starting with "/admin" only to authenticated users
- permit access to all users to the login page
This is how the WebSecurityConfig class looks like after we added the rules.
package com.progressive.code.starter.config;

import org.springframework.beans.factory.annotation.Autowired;
import org.springframework.context.annotation.Configuration;
import org.springframework.security.config.annotation.authentication.builders.AuthenticationManagerBuilder;
import org.springframework.security.config.annotation.web.builders.HttpSecurity;
import org.springframework.security.config.annotation.web.configuration.EnableWebSecurity;
import org.springframework.security.config.annotation.web.configuration.WebSecurityConfigurerAdapter;

@Configuration
@EnableWebSecurity
public class WebSecurityConfig extends WebSecurityConfigurerAdapter {

  @Override
  protected void configure(HttpSecurity httpSecurity) throws Exception {
    httpSecurity
      .authorizeRequests().antMatchers("/admin/**")
        .authenticated()
        .anyRequest()
        .permitAll()
      .and()
        .formLogin().permitAll();
  }

  @Autowired
  public void configureGlobal(AuthenticationManagerBuilder auth) throws Exception {
    auth
      .inMemoryAuthentication()
      .withUser("user").password("secret").roles("USER");
  }
}
When you restart the application and your browser you can test the functionality by repeating the steps above. The start page can now be accessed without logging in and the admin page requires authentication.
This fulfills our requirement to have an admin area that can only be accessed by authorized users (per default USER or ADMIN) roles and a public area everybody can access.
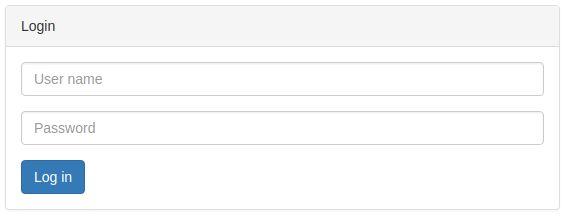
Enhance the UI by adding BootStrap 3
Before we take care of the logout feature, let's improve the look and feel of our login page. Instead of using the default Spring login form we can use Bootstrap to create an enhanced version.
This can be achieved by a couple of different ways. The Bootstrap getting started page describes different ways to install Bootstrap 3. I usually download the Bootstrap 3 compiled package and copy all files to the src/main/resources/static folder.
To utilize all features of Bootstrap we also need jQuery, which can be downloaded from here. I usually choose the latest stable compressed production jQuery file.
Another jQuery plugin I use regularly is jquery-serialize-object which can be downloaded from here.
After downloading and copying all required files my resources folder looks like this.
To build an enhanced login screen, we have to create a new file in the src/main/resources/templates folder named login.html with the following content.
<!DOCTYPE html>
<html xmlns="http://www.w3.org/1999/xhtml"
  xmlns:th="http://www.thymeleaf.org"
  xmlns:sec="http://www.thymeleaf.org/thymeleaf-extras-springsecurity3">
<head>
  <title>Login</title>
  <meta http-equiv="Content-Type" content="text/html; charset=UTF-8" />
  <meta name="viewport" content="width=device-width, initial-scale=1, shrink-to-fit=no" />

  <link rel="stylesheet" type="text/css" media="all"
  	href="../../css/bootstrap.min.css" th:href="@{/css/bootstrap.min.css}" />

  <style>
    body, html {
      height: 100%;
    }
  </style>

</head>
<body>
  <div class="container center-block" style="margin-top: 100px;">
    <div class="row">

      <div class="col-xs-12 col-sm-6 col-sm-offset-3">

        <div class="panel panel-default">
          <div class="panel-heading">Login</div>
          	<div class="panel-body">
          	  <form th:action="@{/login}" method="post">
          		  <div class="form-group">
          			  <input type="text" class="form-control" id="username"
          				  placeholder="User name" name="username" autofocus="autofocus"></input>
          			</div>
          			<div class="form-group">
          			  <input type="password" class="form-control" id="password"
          				  placeholder="Password" name="password"></input>
          			</div>
          			<button type="submit" class="btn btn-primary">Log in</button>
          		</form>
          	</div>
          </div>
        	<div class="alert alert-danger" role="alert" th:if="${param.error}">Invalid
          					username and password.</div>
          <div class="alert alert-success" role="alert"
          					th:if="${param.logout}">You have been logged out.</div>
        </div>
    	</div>
    </div>

    <script type="text/javascript" th:src="@{/js/jquery.min.js}"
          		src="js/jquery.min.js"></script>
    <script type="text/javascript"
          		th:src="@{/js/jquery.serialize-object.min.js}"
          		src="js/jquery.serialize-object.min.js"></script>
    <script type="text/javascript" th:src="@{/js/bootstrap.min.js}"
          		src="js/bootstrap.min.js"></script>

  </body>
</html>
Additionally, we have to modify the previously created WebSecurityConfig class by adding login page("/login"). This change notifies the Spring Security system to use our custom login page instead of the build in HTML form.
package com.progressive.code.starter.config;

import org.springframework.beans.factory.annotation.Autowired;
import org.springframework.context.annotation.Configuration;
import org.springframework.security.config.annotation.authentication.builders.AuthenticationManagerBuilder;
import org.springframework.security.config.annotation.web.builders.HttpSecurity;
import org.springframework.security.config.annotation.web.configuration.EnableWebSecurity;
import org.springframework.security.config.annotation.web.configuration.WebSecurityConfigurerAdapter;

@Configuration
@EnableWebSecurity
public class WebSecurityConfig extends WebSecurityConfigurerAdapter {

  @Override
  protected void configure(HttpSecurity httpSecurity) throws Exception {
	  httpSecurity
      .authorizeRequests().antMatchers("/admin/**")
        .authenticated()
        .anyRequest()
        .permitAll()
      .and()
        .formLogin().loginPage("/login").permitAll();
  }

  @Autowired
  public void configureGlobal(AuthenticationManagerBuilder auth) throws Exception {
    auth
      .inMemoryAuthentication()
      .withUser("user").password("secret").roles("USER");
  }
}
And finally, we have to create a LoginController class in our admin.controller package. This class specifies to load our customized login.html file when a client requests the /login URL. Additionally, I added a LOGGER to log that the corresponding page has been requested.
package com.progressive.code.starter.admin.controller;

import org.slf4j.Logger;
import org.slf4j.LoggerFactory;
import org.springframework.stereotype.Controller;
import org.springframework.ui.Model;
import org.springframework.web.bind.annotation.RequestMapping;
import org.springframework.web.bind.annotation.RequestMethod;

@Controller
public class LoginController {

  private static final Logger LOGGER = LoggerFactory.getLogger(LoginController.class);

  @RequestMapping(value="/login", method=RequestMethod.GET)
  public String login(Model model) {

    LOGGER.info("Login request");

    return "login";

  }
}
Restarting the application and opening http://localhost:8090/admin shows the new login page
Try to close your browser, start a new instance and enter an invalid password and you can see that a corresponding error message shows up.
Add logout feature
The last missing piece for the web starter application is to add a logout link in the admin area. This can be archived by implementing the following changes.
Add the logout link to the adminHome.html file
<!DOCTYPE html>
<html>
<head>
<meta charset="UTF-8" />
<title>Spring Web Demo Admin Start Page</title>
</head>
<body>
	<h1>Admin Start Page</h1>

	<p>
		<a href="/logout">Logout</a>
	</p>

</body>
</html>
And finally, modify the WebSecurityConfig class as shown below
package com.progressive.code.starter.config;

import org.springframework.beans.factory.annotation.Autowired;
import org.springframework.context.annotation.Configuration;
import org.springframework.security.config.annotation.authentication.builders.AuthenticationManagerBuilder;
import org.springframework.security.config.annotation.web.builders.HttpSecurity;
import org.springframework.security.config.annotation.web.configuration.EnableWebSecurity;
import org.springframework.security.config.annotation.web.configuration.WebSecurityConfigurerAdapter;
import org.springframework.security.web.util.matcher.AntPathRequestMatcher;

@Configuration
@EnableWebSecurity
public class WebSecurityConfig extends WebSecurityConfigurerAdapter {

	@Override
  protected void configure(HttpSecurity httpSecurity) throws Exception {
		httpSecurity
			.authorizeRequests().antMatchers("/admin/**")
			  .authenticated()
			  .anyRequest()
				.permitAll()
			.and()
				.formLogin().loginPage("/login").permitAll()
			.and()
				.logout()
			  .logoutRequestMatcher(new AntPathRequestMatcher("/logout"))
			  .permitAll();
	}

  @Autowired
  public void configureGlobal(AuthenticationManagerBuilder auth) throws Exception {
    auth
      .inMemoryAuthentication()
      .withUser("user").password("secret").roles("USER");
  }
}
To allow a user to log out with a simple link (get request), we have to use the logoutRequestMatcher in conjunction with an AntPathRequestMatcher. The reason why we have to do so is explained on the Spring Security CSRF page. As a short summary: Spring security with CSRF filter enabled requires a logout request to be sent using an HTTP post. To use a standard link (GET) the changes mentioned above are required.
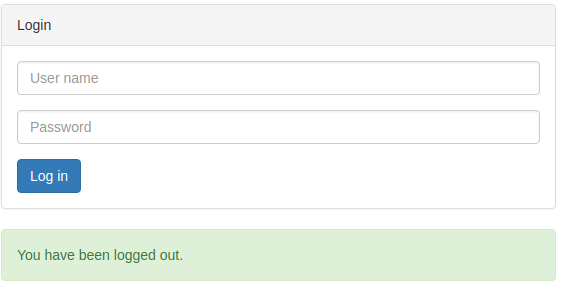
When clicking the log out link you will see the following confirmation page.
Get the Code on GitHub
The entire code is available in this GitHub repository.
Tags
AOP Apache Kafka Bootstrap Go Java Linux MongoDB Nginx Security Spring Spring Boot Spring Security SSL ThymeleafSearch
Archive
- 1 December 2023
- 1 November 2023
- 1 May 2019
- 2 April 2019
- 1 May 2018
- 1 April 2018
- 1 March 2018
- 2 February 2018
- 1 January 2018
- 5 December 2017
- 7 November 2017
- 2 October 2017