Thymeleaf Layout Dialect as Decorator Pattern for a Spring Boot web application
In this post, we are going use the Thymeleaf Layout Dialect to create a web application template for a simple blog site. The example Spring Boot application is based on Thymeleaf and Bootstrap 3.
Introduction
The standard way of working with Thymeleaf is to use includes. This quite often leads to repetitive code, especially, when a website has many pages and each page has several reusable components (e.g. header, navigation, sidebar, and footer). It is repetetive as each content page has to include the same fragments at the same locations. This also has a negative effect when the page layout changes, e.g. when putting the sidebar from the left to the right side.
The decorator pattern used by the Thymeleaf Layout dialect solves these issues. It reminds me of the Sitemesh project that was my preferred template engine couple of years ago.
What is the Decorator pattern
In the context of template engines, the decorator pattern doesn't work with includes on content pages anymore, but it refers to a common template file. Each page basically only provides the main content and by describing which basic template to use the template engine can build the final page. The content is being decorated with the template file.
This approach has advantages compared to the standard way of including fragments:
- The page itself only has to provide the content
- As a template file is being used to build the final page global changes can be applied easily
- The code becomes shorter and cleaner
- As each content page references which template file to use, it is easy to use different templates for different areas of the application (e.g. public area and admin area)
Example Application
To demonstrate how the Layout Dialect works we will implement a simple web application with two pages, a home page and an about page. We use a simple blog layout as shown in the picture below.
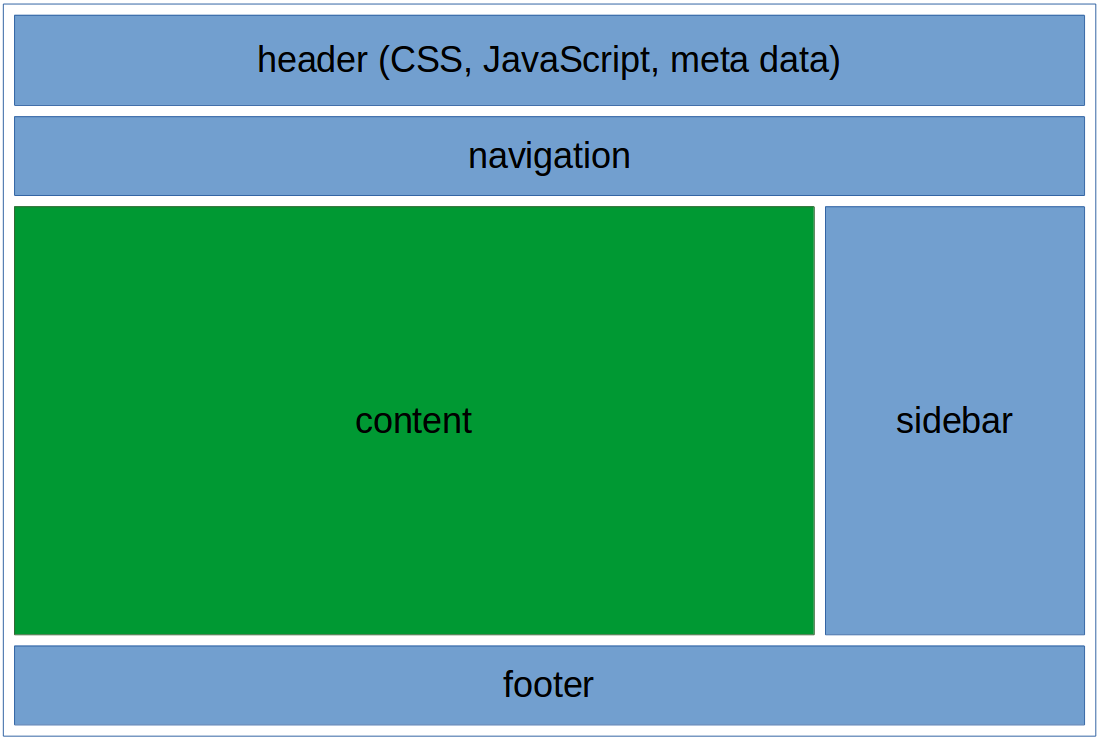
We are going to create a template file that includes the following areas:
- Header: this fragment is used for the static imports (CSS and JavaScript), the title and meta tags
- Navigation: the Bootstrap-based navigation bar
- Content: the content placeholder that will be replaced by the requested page
- Sidebar: a sidebar for additional information
- Footer: the footer area that provides the copyright info
Where is the code?
The code for this example is available in this GitHub repository
Implementation
Let's quickly walk through the Java parts.Maven Dependencies
We need the following maven dependencies:
- spring-boot-starter-web
- spring-boot-starter-thymeleaf
- thymeleaf-layout-dialect
pom.xml
<?xml version="1.0" encoding="UTF-8"?>
<project xmlns="http://maven.apache.org/POM/4.0.0" xmlns:xsi="http://www.w3.org/2001/XMLSchema-instance"
  xsi:schemaLocation="http://maven.apache.org/POM/4.0.0 http://maven.apache.org/xsd/maven-4.0.0.xsd">
  <modelVersion>4.0.0</modelVersion>

  <groupId>com.progressive.code</groupId>
  <artifactId>ThymeleafDecoratorApp</artifactId>
  <version>1.0-SNAPSHOT</version>

  <name>${project.artifactId}</name>

  <parent>
    <groupId>org.springframework.boot</groupId>
    <artifactId>spring-boot-starter-parent</artifactId>
    <version>1.5.9.RELEASE</version>
    <relativePath />
  </parent>

  <properties>
    <project.build.sourceEncoding>UTF-8</project.build.sourceEncoding>
    <project.reporting.outputEncoding>UTF-8</project.reporting.outputEncoding>
    <java.version>1.8</java.version>
  </properties>

  <dependencies>
    <dependency>
      <groupId>org.springframework.boot</groupId>
      <artifactId>spring-boot-starter-web</artifactId>
    </dependency>
    <dependency>
      <groupId>org.springframework.boot</groupId>
      <artifactId>spring-boot-starter-thymeleaf</artifactId>
    </dependency>
    <dependency>
      <groupId>nz.net.ultraq.thymeleaf</groupId>
      <artifactId>thymeleaf-layout-dialect</artifactId>
    </dependency>
    <dependency>
      <groupId>org.springframework.boot</groupId>
      <artifactId>spring-boot-starter-test</artifactId>
      <scope>test</scope>
    </dependency>
  </dependencies>

  <build>
    <plugins>
      <plugin>
        <groupId>org.springframework.boot</groupId>
        <artifactId>spring-boot-maven-plugin</artifactId>
      </plugin>
    </plugins>
  </build>

</project>
Main Class
Spring Boot has built-in support for Thymeleaf and the Thymeleaf Layout Dialect extension. No configuration is required in our main class and we don't need any additional configuration class.
ThymeleafDecoratorApp.java
package com.progressive.code.decorator;

import org.springframework.boot.SpringApplication;
import org.springframework.boot.autoconfigure.SpringBootApplication;

/**
 * Created by abraun on 10/11/2017.
 */
@SpringBootApplication
public class ThymeleafDecoratorApp {

    public static void main(String[] args) {
        SpringApplication.run(ThymeleafDecoratorApp.class, args);
    }

}
Controller
We only have to implement the request mapping for two pages ("home" and "about") without any additional logic or business objects. Based on the different URLs, we only return the name of the content view.
DemoController
package com.progressive.code.decorator.controller;

import org.springframework.stereotype.Controller;
import org.springframework.web.bind.annotation.RequestMapping;

/**
 * Created by abraun on 10/11/2017.
 */
@Controller
public class DemoController {


    @RequestMapping(value="/")
    public String home() {
        return "home";
    }

    @RequestMapping(value="/about")
    public String about() {
        return "about";
    }

}
Template fragments
We could now start creating the layout page directly, but I recommend to extract reusable parts of the layout into fragments. This allows us to reuse these parts in case we have to support different layouts/templates in the future.
Header Fragment
The first fragment includes all head sections of our website, especially the CSS and JavaScript imports, the title and the meta tags. The important part is this line of code <head th:fragment="header">. Here we specify that this head element describes our header fragment, which we can later reference from other files.
header.html
<!DOCTYPE html>

<html xmlns:th="http://www.thymeleaf.org">

<head th:fragment="header">
<meta http-equiv="Content-Type" content="text/html; charset=UTF-8" />
<title>Home</title>

<meta name="keywords" content="Home" />
<meta name="viewport"
	content="width=device-width, initial-scale=1, shrink-to-fit=no" />

<link rel="stylesheet"
	href="https://maxcdn.bootstrapcdn.com/bootstrap/3.3.7/css/bootstrap.min.css"
	integrity="sha384-BVYiiSIFeK1dGmJRAkycuHAHRg32OmUcww7on3RYdg4Va+PmSTsz/K68vbdEjh4u"
	crossorigin="anonymous" />
<link rel="stylesheet"
	href="https://maxcdn.bootstrapcdn.com/bootstrap/3.3.7/css/bootstrap-theme.min.css"
	integrity="sha384-rHyoN1iRsVXV4nD0JutlnGaslCJuC7uwjduW9SVrLvRYooPp2bWYgmgJQIXwl/Sp"
	crossorigin="anonymous" />
<link rel="stylesheet" href="css/styles.css" />
<script src="https://ajax.googleapis.com/ajax/libs/jquery/3.2.1/jquery.min.js"></script>
<script
	src="https://maxcdn.bootstrapcdn.com/bootstrap/3.3.7/js/bootstrap.min.js"
	integrity="sha384-Tc5IQib027qvyjSMfHjOMaLkfuWVxZxUPnCJA7l2mCWNIpG9mGCD8wGNIcPD7Txa"
	crossorigin="anonymous"></script>

</head>

<body>
</body>

</html>
Navigation Fragment
Next, we define the navigation fragment, that includes our Bootstrap based navigation bar. Again, we specify that the nav element can be used as a named fragment ("navigation").
navigation.html
<!DOCTYPE html>

<html xmlns:th="http://www.thymeleaf.org">

<head>
<title>Header</title>
</head>

<body>

  <nav class="navbar navbar-default" th:fragment="navigation">

    <div class="container">
      <div class="navbar-header">
        <button type="button" class="navbar-toggle collapsed"
          data-toggle="collapse" data-target="#navbarNavAltMarkup"
          aria-expanded="false">
          <span class="sr-only">Toggle navigation</span> <span
            class="icon-bar"></span> <span class="icon-bar"></span> <span
            class="icon-bar"></span>
        </button>
        <a class="navbar-brand" href="/">Home</a>
      </div>

      <div class="collapse navbar-collapse" id="navbarNavAltMarkup">
        <ul class="nav navbar-nav navbar-right">
          <li><a class="nav-item nav-link active" href="about">About</a></li>
        </ul>
      </div>
    </div>
  </nav>

</body>

</html>
Sidebar Fragment
We can follow a similar approach for our sidebar fragment.
sidebar.html
<!DOCTYPE html>

<html xmlns:th="http://www.thymeleaf.org">

<head>
<title>Header</title>
</head>

<body>

  <div th:fragment="sidebar">
    <div class="panel panel-default">
      <div class="panel-heading">Panel 1</div>
      <div class="panel-body">
        <div style="padding-bottom: 5px;">Panel 1 Content</div>
      </div>
    </div>

    <div class="panel panel-default">
      <div class="panel-heading">Panel 2</div>
      <div class="panel-body">
        <div style="padding-bottom: 5px;">Panel 2 Content</div>
      </div>
    </div>
  </div>

</body>

</html>
Footer Fragment
And finally, we create the footer fragment.
footer.html
<!DOCTYPE html>

<html xmlns:th="http://www.thymeleaf.org">

<head>
<title>Header</title>
</head>

<body>

  <footer class="footer" th:fragment="footer">
    <div class="container border">
      <div class="row">
        <div class="text-dark col-auto mr-auto">© Company Name</div>
      </div>
    </div>
  </footer>

</body>

</html>
Layout (template file)
After creating the individual fragments, we are now able to create the page layout.
In this case, our layout page is quite simple. Based on a standard HTML page we can add the fragments by using th:replace. The head element is being replaced using <head th:replace="fragments/header :: header">. The syntax is "<path to the fragment file> :: <name of the fragment>". We can add a couple of div elements that use the other fragments we created before.
Additonally, we added <div layout:fragment="content"></div> as a placeholder for the actual content pages.
layout.html
<!DOCTYPE html>

<html xmlns:th="http://www.thymeleaf.org" xmlns:layout="http://www.ultraq.net.nz/web/thymeleaf/layout">

<head th:replace="fragments/header :: header">
<title>Header</title>
</head>

<body>

  <div th:replace="fragments/navigation :: navigation"></div>

  <div class="container" id="mainContent">

    <div class="row">
      <div class="col-md-8">
        <div layout:fragment="content"></div>
      </div>

      <div class="col-md-4">
        <div th:replace="fragments/sidebar :: sidebar"></div>
      </div>
    </div>
  </div>

  <div th:replace="fragments/footer :: footer"></div>

</body>

</html>
Content pages
Finally, we can create the content pages. Let's start with the homepage.
Home
To be able to inject the actual content into our template only two steps are required. First, we have to provide the information which template to use. We can add this information in the HTML element using <html xmlns:layout="http://www.ultraq.net.nz/thymeleaf/layout" layout:decorator="layout/layout">.
Additionally, we have to specify which part of the page should be used as content <div layout:fragment="content">.
When the controller class returns "home" as the content page to use, the following things happen:
- Thymeleaf loads the home.html file and discovers that a decorator (our layout file) has to be used
- Now the layout file is being loaded. As the template file requires several fragments to be included, these files are being loaded and injected
- Thymeleaf also identifies that there is a placeholder for the content. Our requested content file (home) includes a content fragment and this will be used to inject the content
home.html
<!DOCTYPE html>
<html xmlns:layout="http://www.ultraq.net.nz/thymeleaf/layout" layout:decorator="layout/layout">

<head>
<title>Layout</title>
</head>

<body>

  <div layout:fragment="content">


    <h1>Title</h1>

    <h2>Section</h2>

    <p>Lorem ipsum dolor sit amet, eu in mollis morbi nunc nulla
      metus, ipsum etiam dictum natoque nec eleifend. Congue nec porttitor,
      ullamcorper neque eu posuere tristique arcu, feugiat magna quam
      tristique nonummy diam torquent, venenatis ut, fugit suspendisse quis
      nec.</p>

    <h3>Sub-Section</h3>

    <p>Lorem ipsum dolor sit amet, eu in mollis morbi nunc nulla
      metus, ipsum etiam dictum natoque nec eleifend. Congue nec porttitor,
      ullamcorper neque eu posuere tristique arcu, feugiat magna quam
      tristique nonummy diam torquent, venenatis ut, fugit suspendisse quis
      nec.</p>

  </div>

</body>
</html>
About
The last step is to add the about page.
about.html
<!DOCTYPE html>
<html xmlns:layout="http://www.ultraq.net.nz/thymeleaf/layout" layout:decorator="layout/layout">

<head>
<title>Layout</title>
</head>

<body>

  <div layout:fragment="content">


    <h1>About</h1>

    <p>Lorem ipsum dolor sit amet, eu in mollis morbi nunc nulla
      metus, ipsum etiam dictum natoque nec eleifend. Congue nec porttitor,
      ullamcorper neque eu posuere tristique arcu, feugiat magna quam
      tristique nonummy diam torquent, venenatis ut, fugit suspendisse quis
      nec.</p>

  </div>

</body>
</html>
Start and test the application
We can now start the application either from the IDE or from the command line.
Command Line
We can use
mvn package
to build the application from the command line and
java -jar target/ThymeleafDecoratorApp-1.0-SNAPSHOT.jar
to start the application.
Test the application
After starting up we can access the application using this URL: localhost:8090
Code on GitHub
The code for this example is available in this GitHub repository
Tags
AOP Apache Kafka Bootstrap Go Java Linux MongoDB Nginx Security Spring Spring Boot Spring Security SSL ThymeleafSearch
Archive
- 1 December 2023
- 1 November 2023
- 1 May 2019
- 2 April 2019
- 1 May 2018
- 1 April 2018
- 1 March 2018
- 2 February 2018
- 1 January 2018
- 5 December 2017
- 7 November 2017
- 2 October 2017