Introduction
The example code is based on the previous post that described how to set up a Spring Boot CRUD application.
This time we add client-side form validation to the existing web application. As we already use jQuery in the context of Bootstrap 3, we are going to add the jQuery validation plugin. Additionally, we are going to customize the plugin to support the way Bootstrap displays form errors.
Validation Rules
The existing application already allows you to to create, read, update and delete notes. The notes object consists of the following attributes:
id: unique id of aNotesobjecttitle: title of aNotesobject (required, minimum length 5 and maximum length 100 characters)content: content of aNotesobject (required, minimum length 8 and maximum length 10,000 characters)
Where is the code?
The code for this post is available in this GitHub repository.
Implementation
The following sections cover the individual steps to enhance the web application.
Edit View: add the validation rules
First, we have to add the following two additional JavaScript files:
jquery.validate.min.js: the validation pluginjquery.validate.bootstrap.js: the validation plugin extension to support Bootstrap (described in the next section)
To activate the form validation in the next step we have to ensure to add an id to the form element id="notesForm". This allows us to easily select the correct form HTML element and to attach validation.
Finally, we add a JavaScript block to define the rules, custom messages and activate validation.
It usually is a good idea to wrap the code into a $(document).ready(function () { ... } block to ensure that the document has been fully loaded before referencing elements on the page.
We activate validation for our form using $("#notesForm").validate( options ). The options object includes two main areas rules and messages.
Rules
We are going to specify all validation rules using a JSON object. This is quite easy and self-explaining. We only have to use the id of the form input element and add the validation rules. The example below shows the validation rules, based on our requirements described in the first section.
rules: {
  'title': {
    required: true,
    minlength: 5,
    maxlength: 100
  },
  'content': {
    required: true,
    minlength: 8,
    maxlength: 10000
  }
}
The jQuery validation plugin provides many standard validation methods. You can find an overview here.
Optional: Custom messages
The validation plugin provides for all validation rules default messages, even for different languages if you include the corresponding localization files. We want to add a custom message for the required rule of the title element. It is the same idea as for the rules specification. We only have to use the form input element as a key and add the messages for each validation rule we want to customize.
messages: {
  title: {
    required: "Please enter the title!"
  }
}
The final HTML file that includes all required changes is below.
<!DOCTYPE html>
<html xmlns="http://www.w3.org/1999/xhtml"
  xmlns:th="http://www.thymeleaf.org">
  <head>
    <meta charset="UTF-8" />
    <title>Notes</title>

    <link rel="stylesheet" type="text/css" media="all" href="../../css/bootstrap.min.css" th:href="@{/css/bootstrap.min.css}" />

    <script type="text/javascript" th:src="@{/js/jquery.min.js}" src="js/jquery.min.js"></script>
    <script type="text/javascript" th:src="@{/js/bootstrap.min.js}" src="js/bootstrap.min.js"></script>
    <!-- include the jQuery validation plugin -->
    <script type="text/javascript" th:src="@{/js/jquery.validate.min.js}" src="js/jquery.validate.min.js"></script>
    <!-- add the required customizations for Bootstrap -->
    <script type="text/javascript" th:src="@{/js/jquery.validate.bootstrap.js}" src="js/jquery.validate.bootstrap.js"></script>
  </head>
  <body>
    <div class="container">

      <h1>Notes</h1>

      <form id="notesForm" class="form-group" action="/notesEdit" th:action="@{/notesEdit}" method="post">
        <input th:type="hidden" name="id" th:field="${notes.id}" />
        <div class="form-group">
          <label for="title">Title</label>
          <input type="text" class="form-control" id="title" th:field="${notes.title}" />
        </div>
        <div class="form-group">
          <label for="content">Content</label>
          <textarea class="form-control" id="content" th:field="${notes.content}"></textarea>
        </div>
        <button type="submit" class="btn btn-primary">Save</button>
        <a href="#" th:href="@{/}" class="btn btn-danger" role="button">Cancel</a>
      </form>

    </div>

    <!-- define validation rules and activate validation -->
    <script>
      $(document).ready(function () {
        $("#notesForm").validate({
          rules: {
            'title': {
              required: true,
              minlength: 5,
              maxlength: 100
            },
            'content': {
              required: true,
              minlength: 8,
              maxlength: 10000
            }
          },
          messages: {
            title: {
              required: "Please enter the title!"
            }
          }
        });
      });
    </script>

  </body>
</html>
Customize jQuery validation plugin
As we use Bootstrap for the user interface, we want to use Bootstrap's look and feel for validation and error handling as well. We can achieve this by customizing the jQuery plugin.
The solution below was introduced in this Stackoverflow post.
The basic idea is to overwrite the following methods from the validation plugin:
highlight: Is being invoked when a validation error was discovered for a specific form input element. We simply add thehas-errorclass and remove thehas-successclass.unhighlight: Is being invoked when a no validation error was discovered for a specific form input element.errorPlacement: Specifies how and where to place the error text for each form input element.
jQuery.validator.setDefaults({
  errorElement: "span",
  errorClass: "help-block",

  // Style the HTML element in case of validation errors
  highlight: function (element, errorClass, validClass) {
    if (!$(element).hasClass('novalidation')) {
      $(element).closest('.form-group').removeClass('has-success').addClass('has-error');
    }
  },

  // Style the HTML element in case of validation success
  unhighlight: function (element, errorClass, validClass) {
    if (!$(element).hasClass('novalidation')) {
      $(element).closest('.form-group').removeClass('has-error').addClass('has-success');
    }
  },

  // Place the error text for different input element types
  errorPlacement: function (error, element) {
    if (element.parent('.input-group').length) {
      error.insertAfter(element.parent());
    }
    else if (element.prop('type') === 'radio' && element.parent('.radio-inline').length) {
      error.insertAfter(element.parent().parent());
    }
    else if (element.prop('type') === 'checkbox' || element.prop('type') === 'radio') {
      error.appendTo(element.parent().parent());
    }
    else {
      error.insertAfter(element);
    }
  }
});
// Reference: https://stackoverflow.com/questions/18754020/bootstrap-3-with-jquery-validation-plugin
Start and test the application
We can now start the application either from the IDE or from the command line.
Command Line
We can use mvn package to build the application from the command line and java -jar target/CrudClientValidationApp-1.0-SNAPSHOT.jar to start the application.
Test the application
After starting up we can access the application using localhost:8090
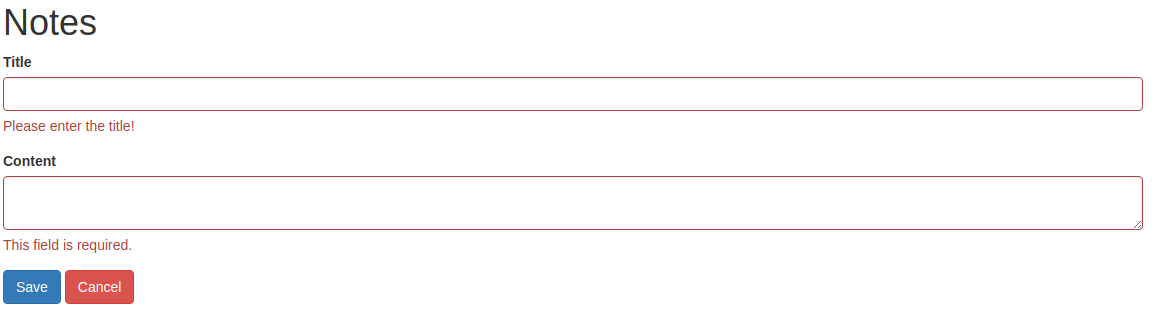
The screenshot below show how the form looks like when validation errors occur.
Summary
Implementing client-side server validation using jQuery validation plugin with minor customization provides an easy way to improve the user experience by providing fast feedback on validation error without the requirement to go through a server round-trip.
It usually is a good idea to combine client-side validation with server-side validation, to ensure that user entered data meets the validation requirements. Some people might deactivate JavaScript support in the browser or try to invoke your services with tools like Postman or curl. Additional information and a fully working solution for server-side validation are available here.
Code on GitHub
The code for this example is available in this GitHub repository.